How to Connect Pagewheel to Your Email Service Provider (ESP) with Zapier
We make it easy for you to connect Pagewheel to your email service provider, such as Mailchimp, ConvertKit, or MailerLite, through Zapier.
Zapier then handles the process of automatically adding new customer email addresses to your subscription list, saving you time and effort.

Preparing to Use Automation
Before you can begin, there are a few tasks you need to complete.
Manually Sync Existing Customer Details
Because this automation only applies to new customers and signups, you’ll first need to manually upload your existing customer details.
Start by downloading your customer information as a CSV file. After downloading, upload the file to your chosen service provider.
The steps to upload may vary depending on your provider. Here are instructions for some commonly used services:
Setting up Accounts
You need two accounts from external providers:
- Zapier Account: Zapier handles the automation process for you.
- Email Service Provider: This is where you’ll send out your email campaigns. This guide covers Mailchimp, but other options include ConvertKit and MailerLite.
Both Zapier and Mailchimp offer free plans to help get you started.
Signing Up For a Free Trial with Zapier
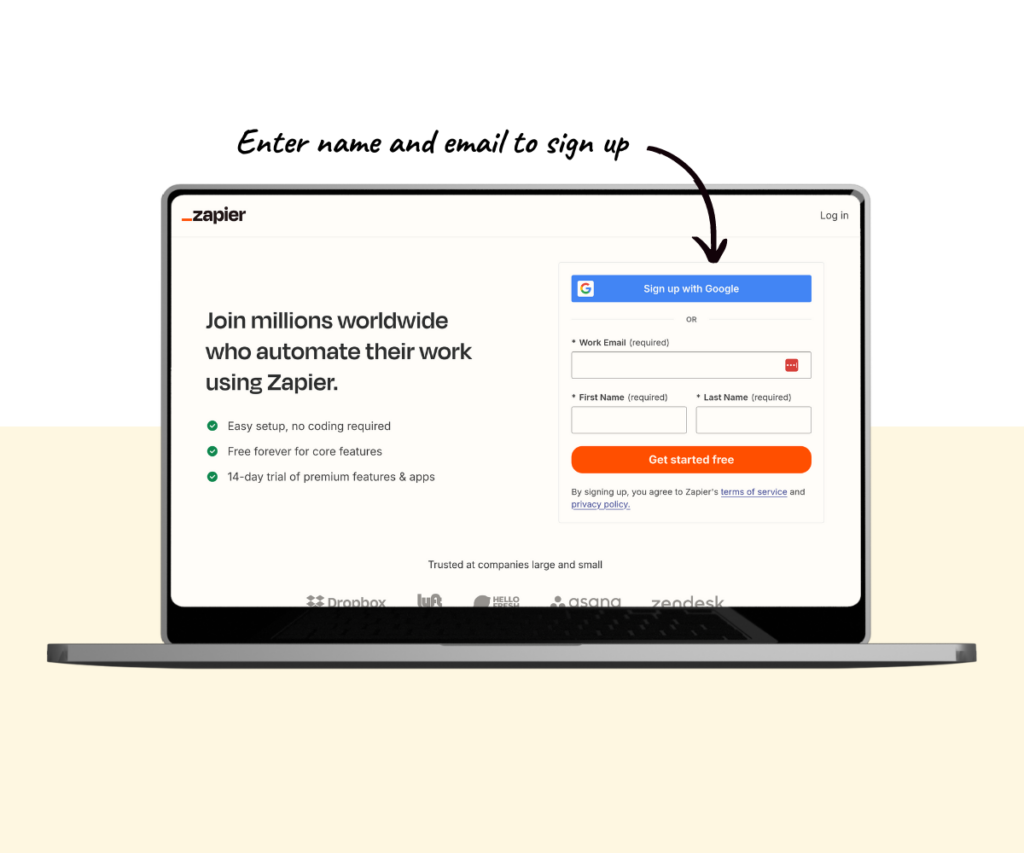
Visit the Zapier sign-up page to create a free account.
All you need is your name and email address. Follow the on-screen instructions to complete the setup process.
Signing Up For a Free Trial with Mailchimp
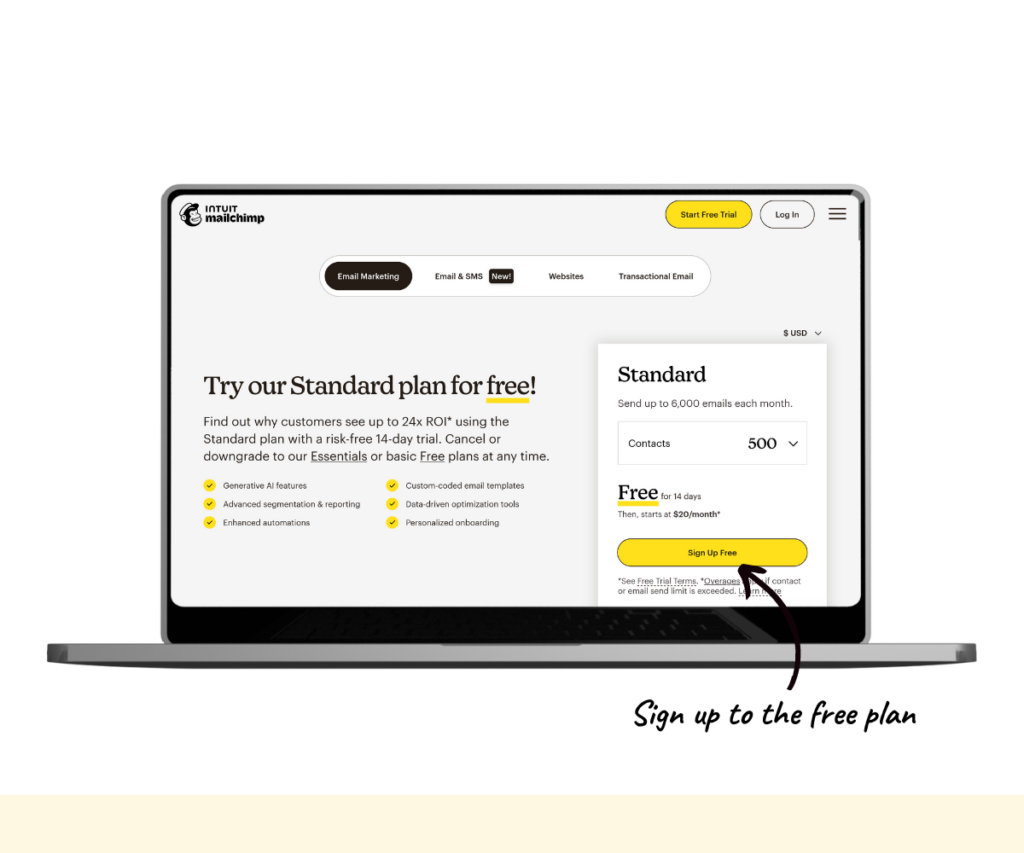
Visit the Mailchimp pricing page and select the free plan. The free plan has enough functionality to integrate with Zapier.
Click the “Sign Up Free” button to begin.
You’ll be asked to provide your email address and fill in some basic information to set up your account.
Be sure to complete all the steps during the setup. Otherwise, you won’t be able to connect your account to Zapier.
Accessing Zapier Integration in Pagewheel
To set up Zapier with Pagewheel, you first need to access the Zapier integration from your Pagewheel account.
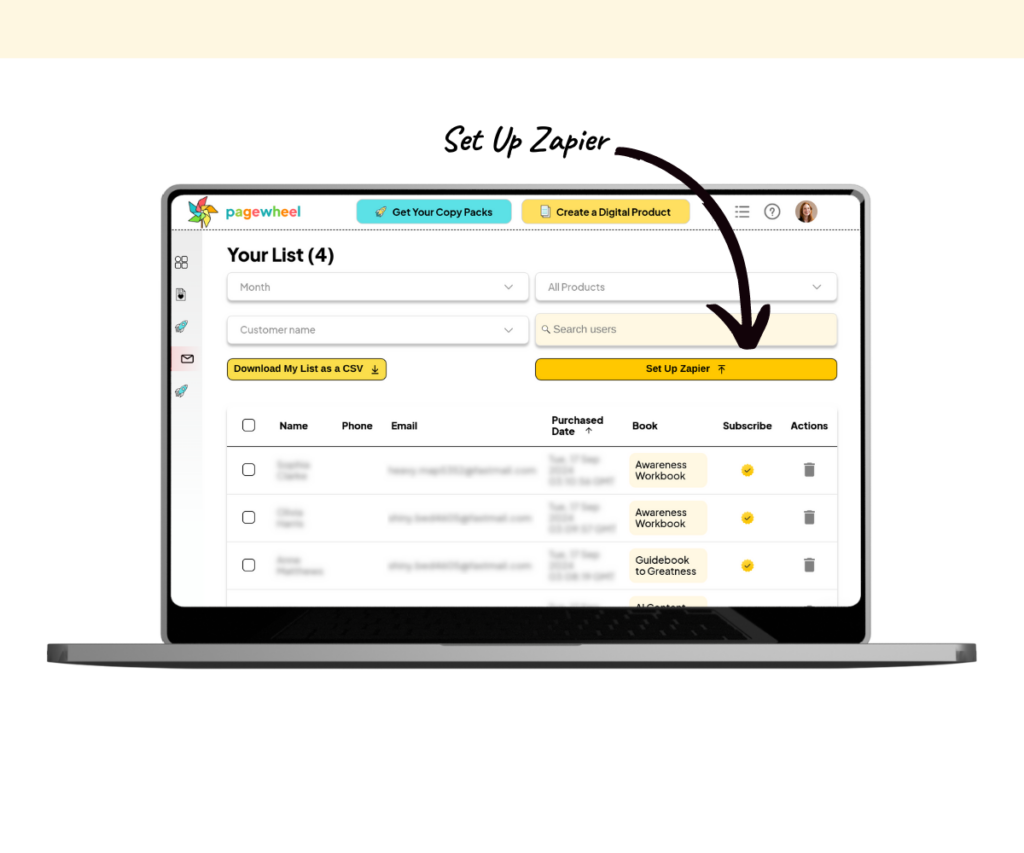
You can find the Zapier integration option in the “Your List” screen.
To navigate there, click the “Your List” icon in the topbar. You can also click the envelope icon in the sidebar.
For more information, see How to View Your Customer Information.
This “Your List” screen shows all your customer contact details. If you don’t have any customers or sign-ups yet, the list will appear empty.
To start setting up automation, click the “Set Up Zapier” button.
Setting Up Your First Automation
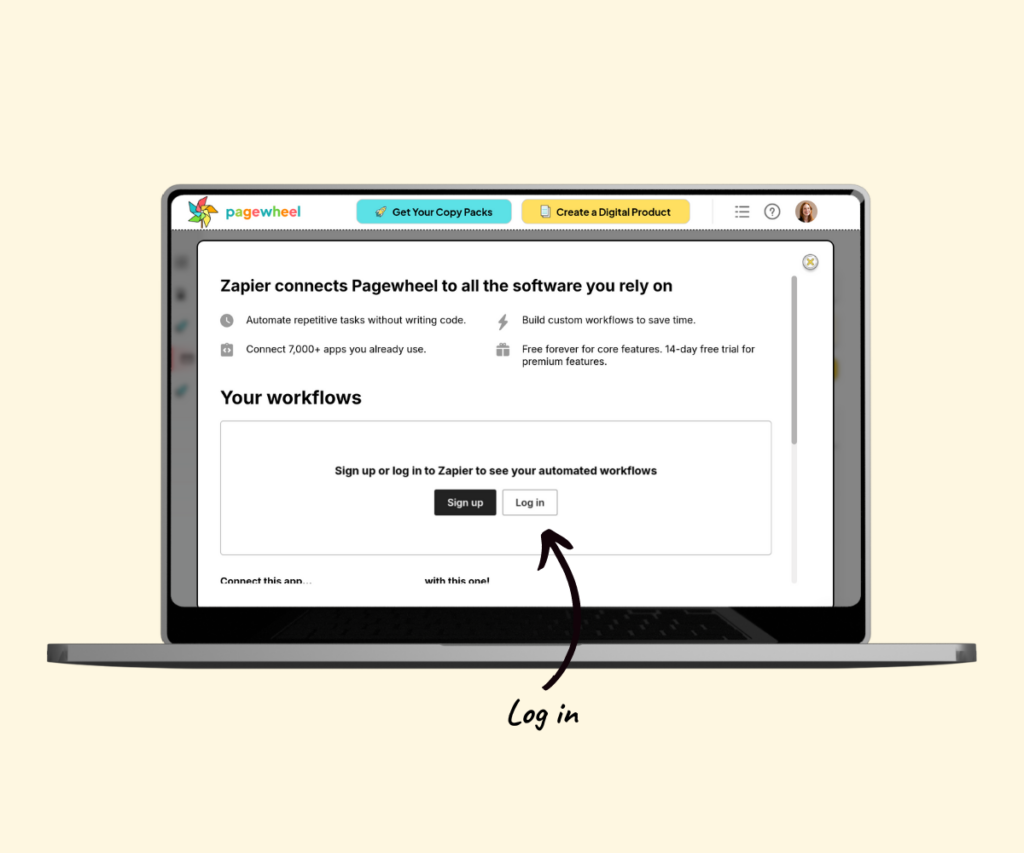
After clicking the “Set Up Zapier” button, the setup window will appear.
Click the “Log in” button and sign into your Zapier account.
A new window will open where you can enter your username and password.
Using a Pre-Built Workflow
Pre-built workflows are already available. These will automatically send your customer email list to various services, including:
- ActiveCampaign
- AWeber
- BirdSend
- ConvertKit
- Flodesk
- Klaviyo
- LeadConnect
- Mailchimp
- MailerLite
- Mailgun
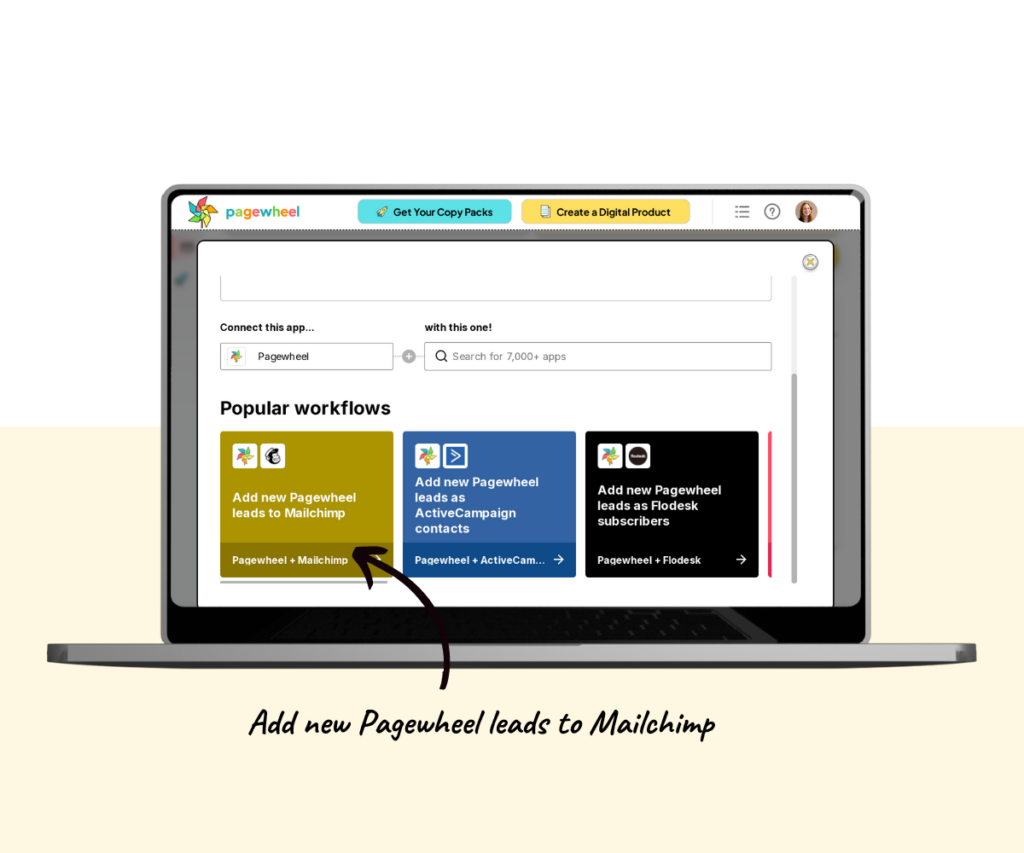
You’ll find these in the “Popular Workflows” section.
In this tutorial, we use Mailchimp. You should already have a Mailchimp account.
Under “Popular Workflows,” click the “Add new Pagewheel leads to Mailchimp” workflow.
Automation Workflow Overview
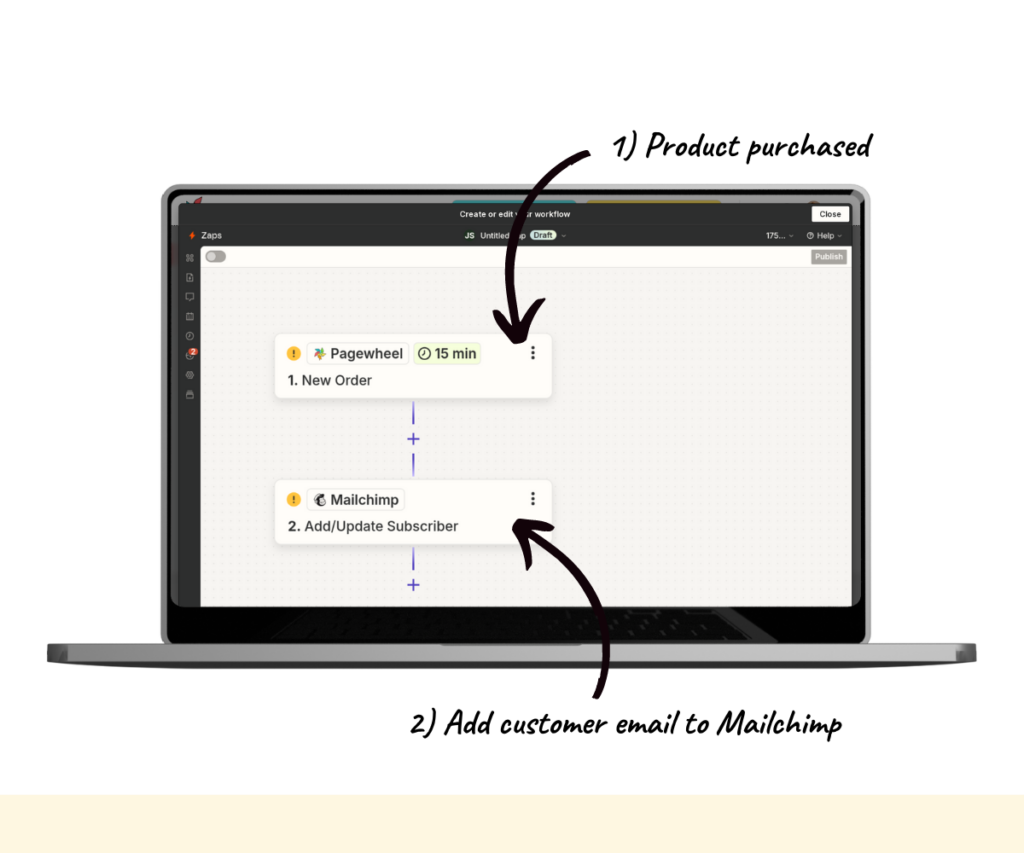
Once the window opens, you’ll see the automation workflow displayed as a flow chart.
This workflow is made up of two steps:
- Step 1: Trigger Event
- App: Pagewheel
- Trigger: New Order (Triggered when someone signs up for or purchases one of your products)
- Step 2: Action Event
- App: Mailchimp
- Action: Add/Update Subscriber (Adds the customer’s email to your Mailchimp subscriber list)
This automation means that whenever a customer purchases or signs up for one of your products, their details are automatically added to your Mailchimp list.
Adding Your Accounts to the Workflow
To get things running, you need to add your accounts to the workflow.
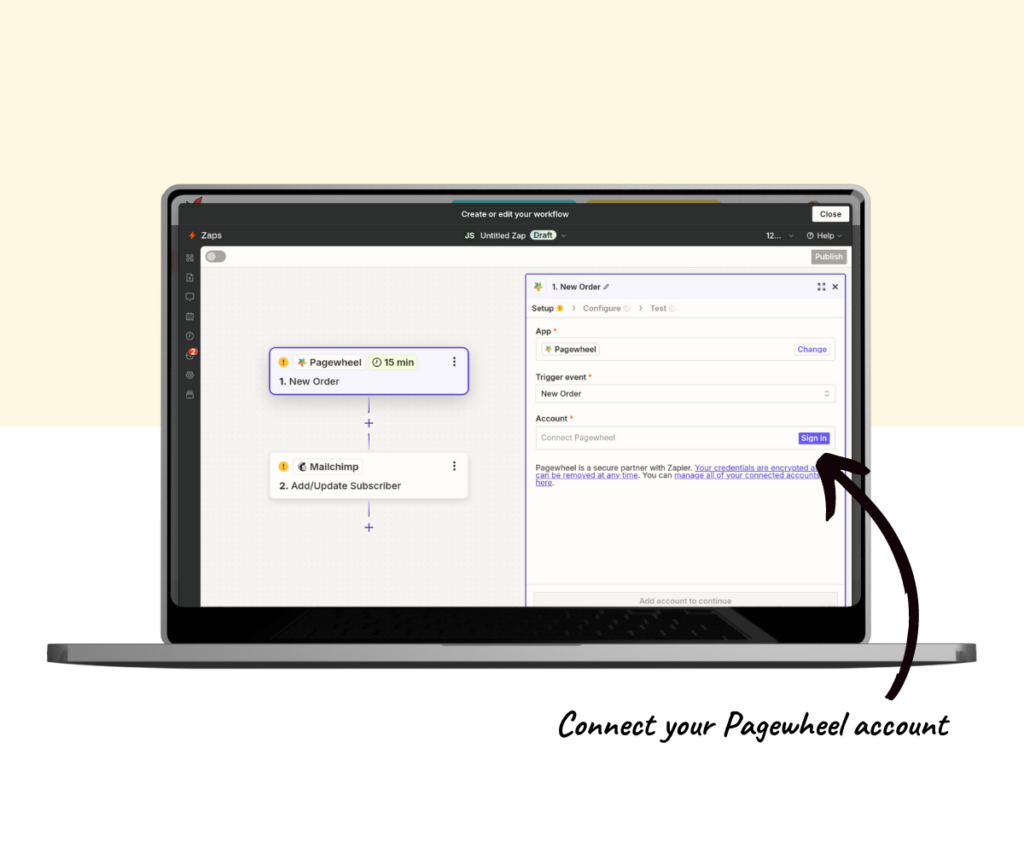
Connecting to Pagewheel
Click on the first step, the Pagewheel New Order trigger event, and a window will pop up.
Simply click the “Sign in” button to connect your Pagewheel account.
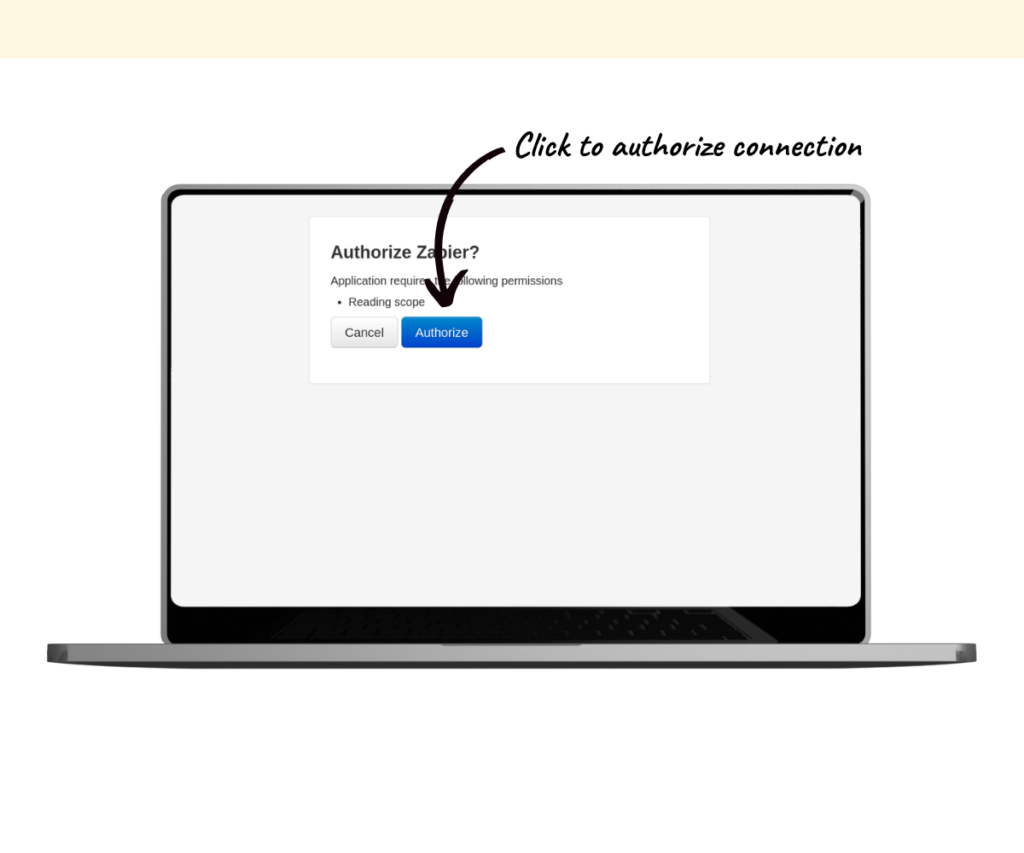
A new window will appear asking for authorization.
Click the ‘Authorize’ button to complete the connection.
The window will close, and you’ll see the email address you use with Pagewheel in the Account field.
Press the blue ‘Continue’ button to continue.

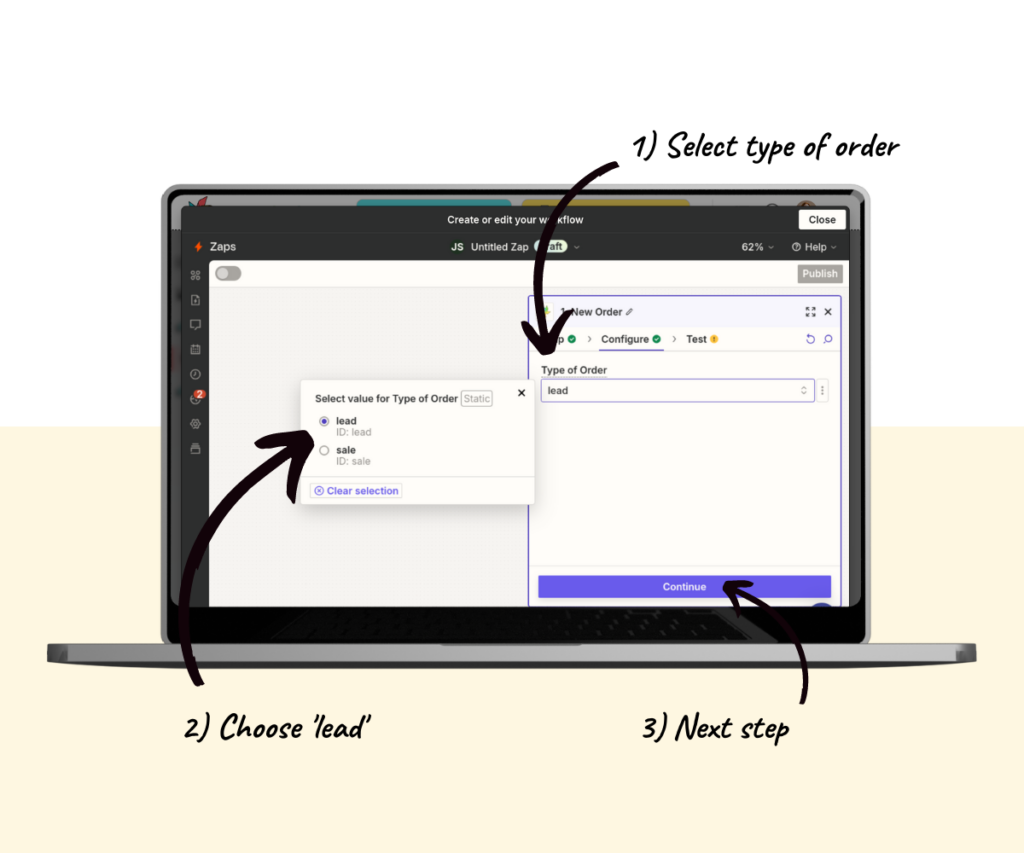
Configuring the Pagewheel Connection
Next, you’ll need to choose which type of order will trigger this workflow.
You have two options:
- ‘lead’ – for free sign-ups, where the customer hasn’t purchased anything (such as a free lead magnet).
- ‘sale’ – for paid purchases, when a customer buys one of your digital products.
This lets you organize your customers into two groups, each with its own email subscription list.
Free product users will be added to one list, while paying customers will be added to another. This lets you craft better tailored emails for each group.
In this example, we use the ‘lead’ trigger for free sign ups.
Click the “Type of Order” box, choose ‘lead’, and then press ‘Continue’ to move to the next step.
Testing the Pagewheel Connection
Next, you can test to ensure the trigger is set up correctly.
Simply press the “Test trigger” button.

The test should complete successfully.
Once it does, press the ‘Continue’ button to proceed.
If you encounter any issues, double-check that your Mailchimp account is fully set up.
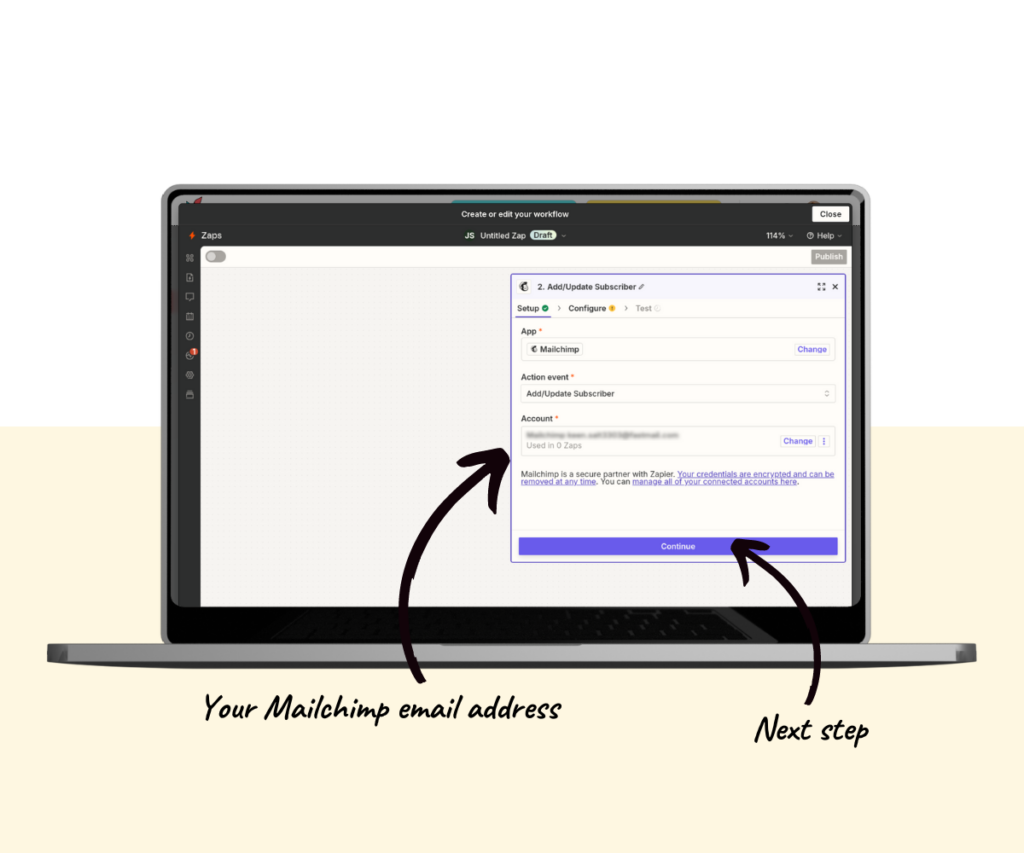
Connecting to Mailchimp
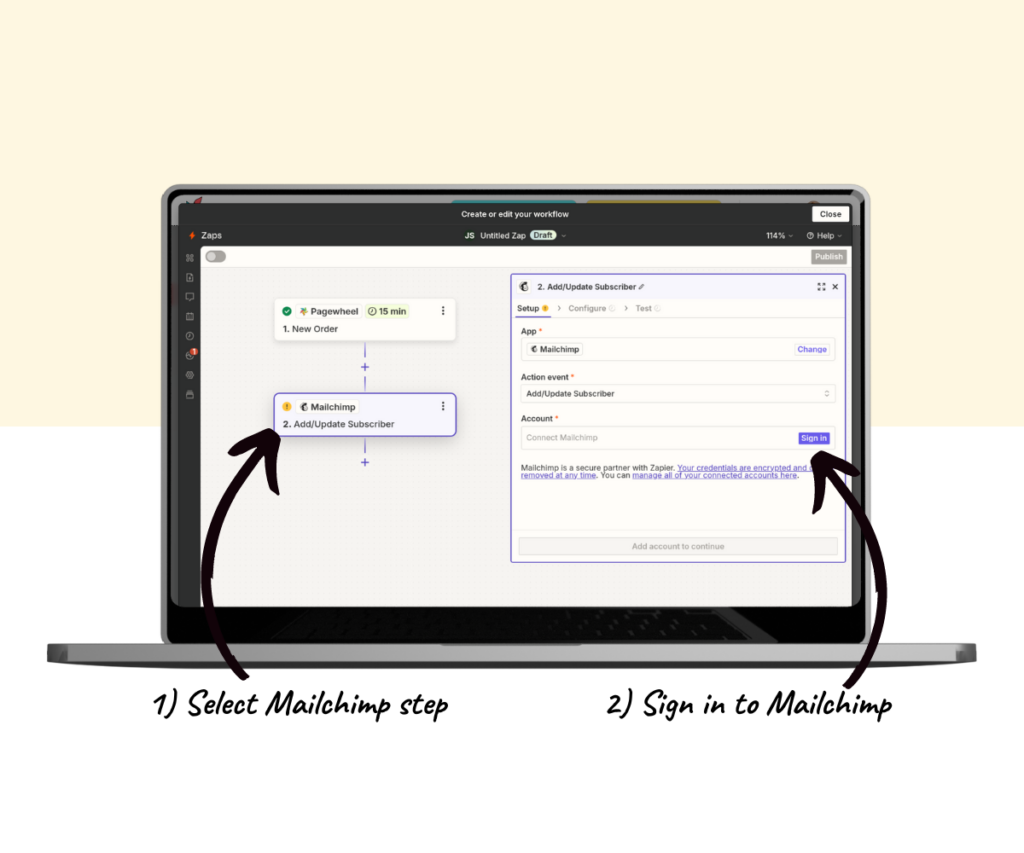
Next, we’ll move on to the second step of the automation workflow.
This is the Mailchimp Add/Update Subscriber event.
Make sure this step is selected, then click the “Sign in” button in the window to connect your Mailchimp account.
A new window will appear.
Enter your Mailchimp login details then click “Log In” to proceed.

You’ll then need to complete the authorization.
Click the ‘Allow’ button to let Zapier connect to your Mailchimp account.
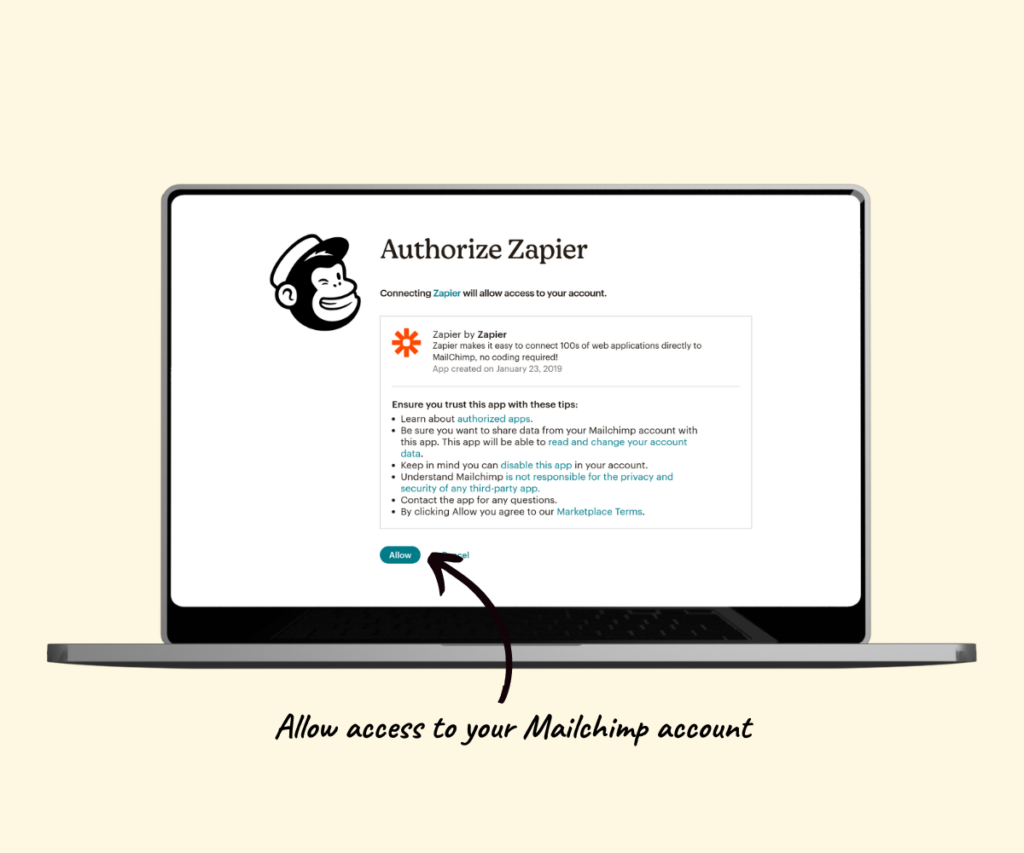
After the window closes, you’ll see your Mailchimp email address in the Account field.
Click the ‘Continue’ button to go to the next step.
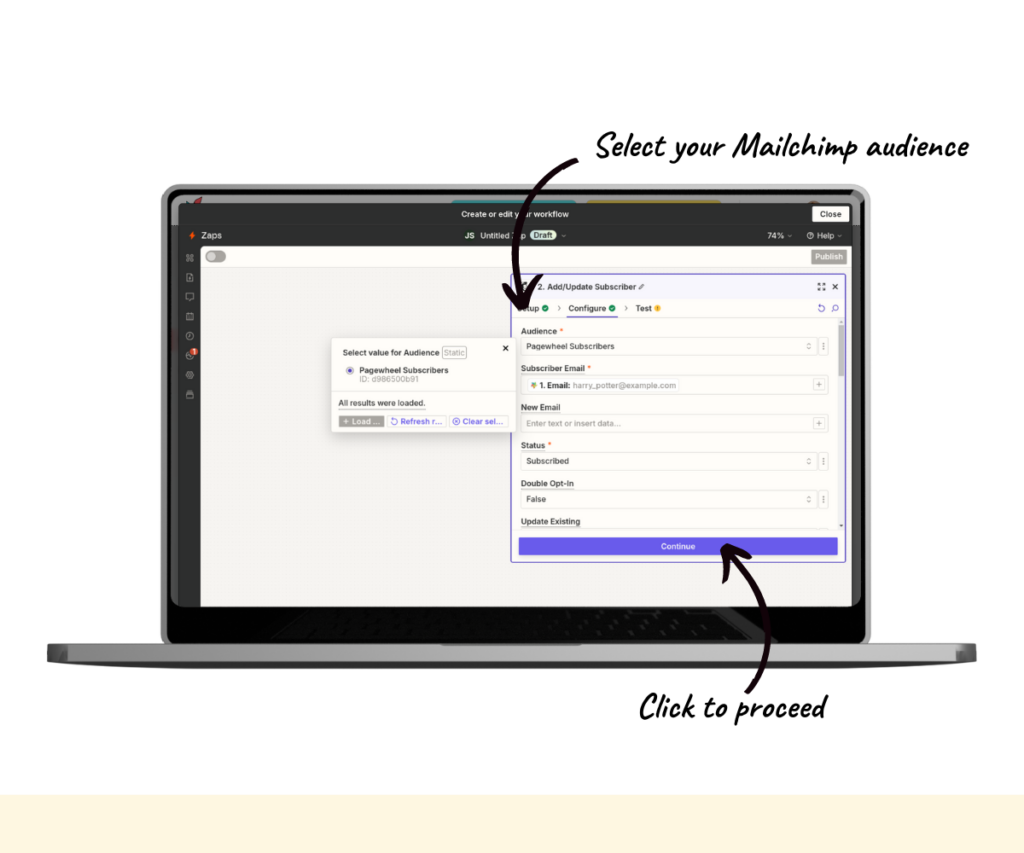
Configuring the Mailchimp Connection
Next, you’ll reach the ‘Configure’ step.
Click the ‘Audience’ field, and select the business name you used when signing up for Mailchimp.
Then, click the ‘Continue’ button to proceed.
If nothing appears when you click the ‘Audience’ field, return to your Mailchimp account and make sure it is fully set up.
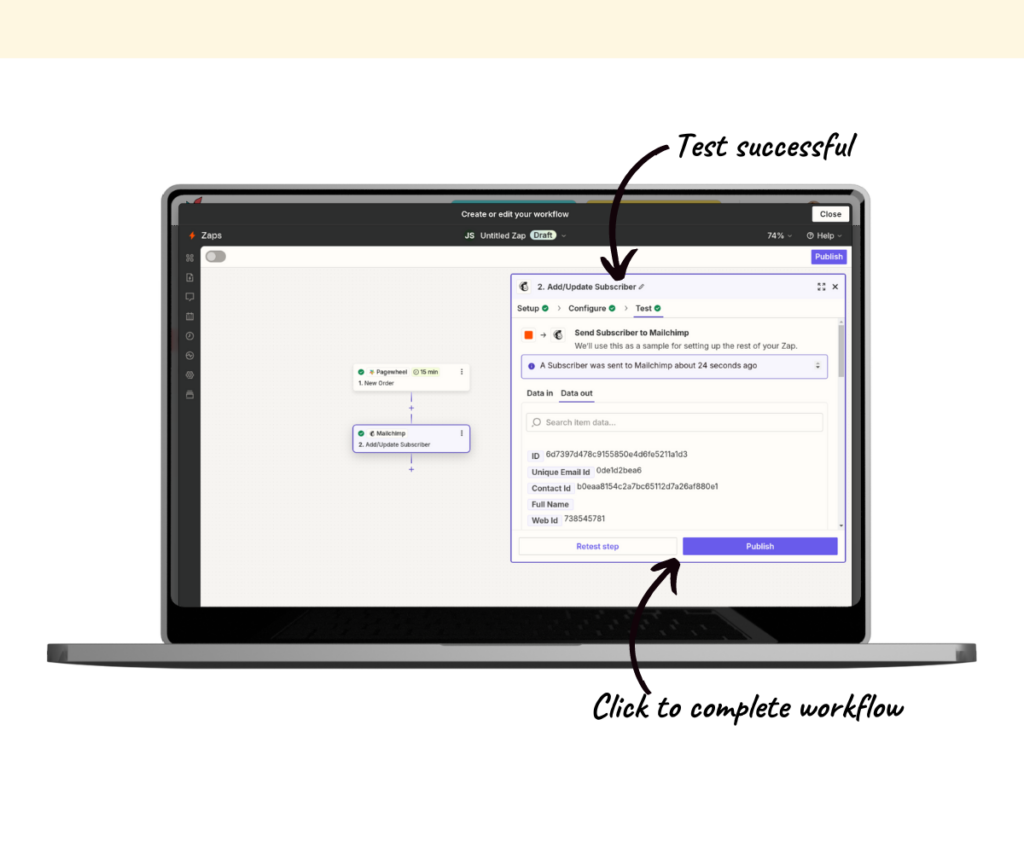
Testing the Mailchimp Connection
Finally, we can check if everything is working.
Just press the “Test step” button.

The test should complete successfully, and you’ll see a confirmation message.
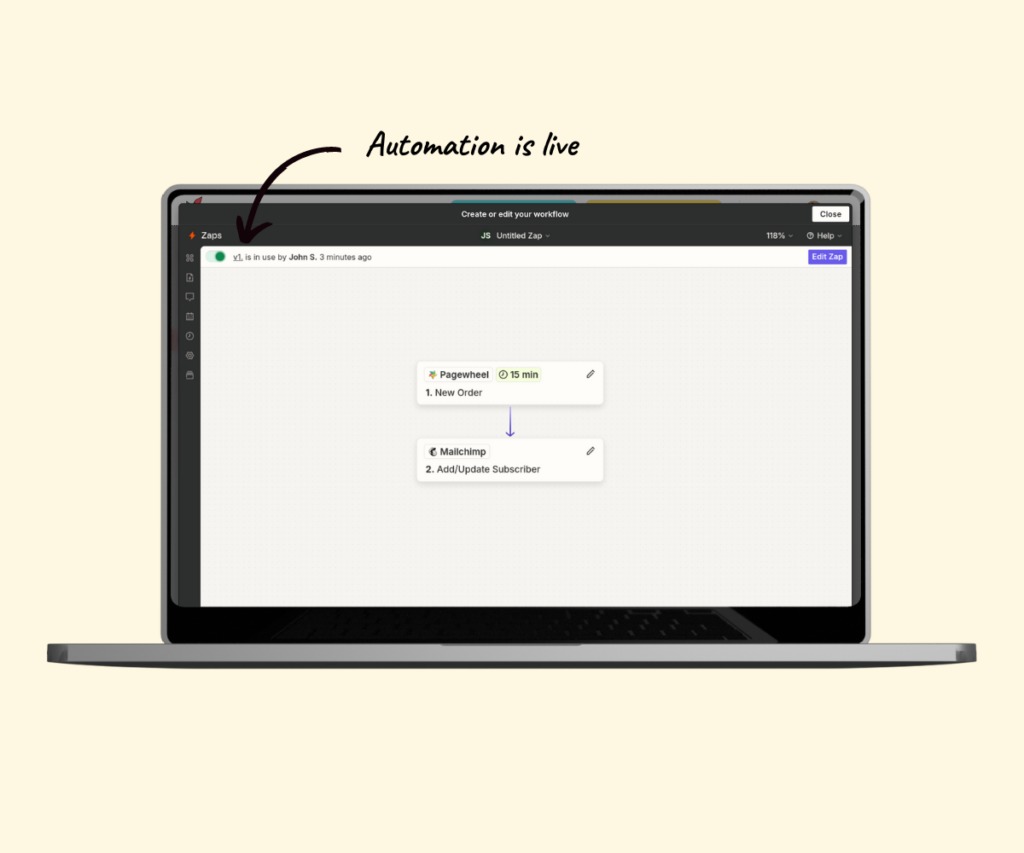
Once confirmed, click the ‘Publish’ button to move forward.
After a brief loading screen, your automation workflow will go live.
A green indicator will appear in the top left corner, confirming that your automation is running.
From now on, when someone signs up, their email will be added to your Mailchimp subscriber list.
Verifying Your Automation Workflow with Mailchimp
Follow these steps to ensure your Zapier automation is successfully adding subscribers to your Mailchimp list.
Step 1: Sign Up for a Product Using a Test Email
Go to the sign-up page for a free product (such as a free lead magnet) by following these steps:
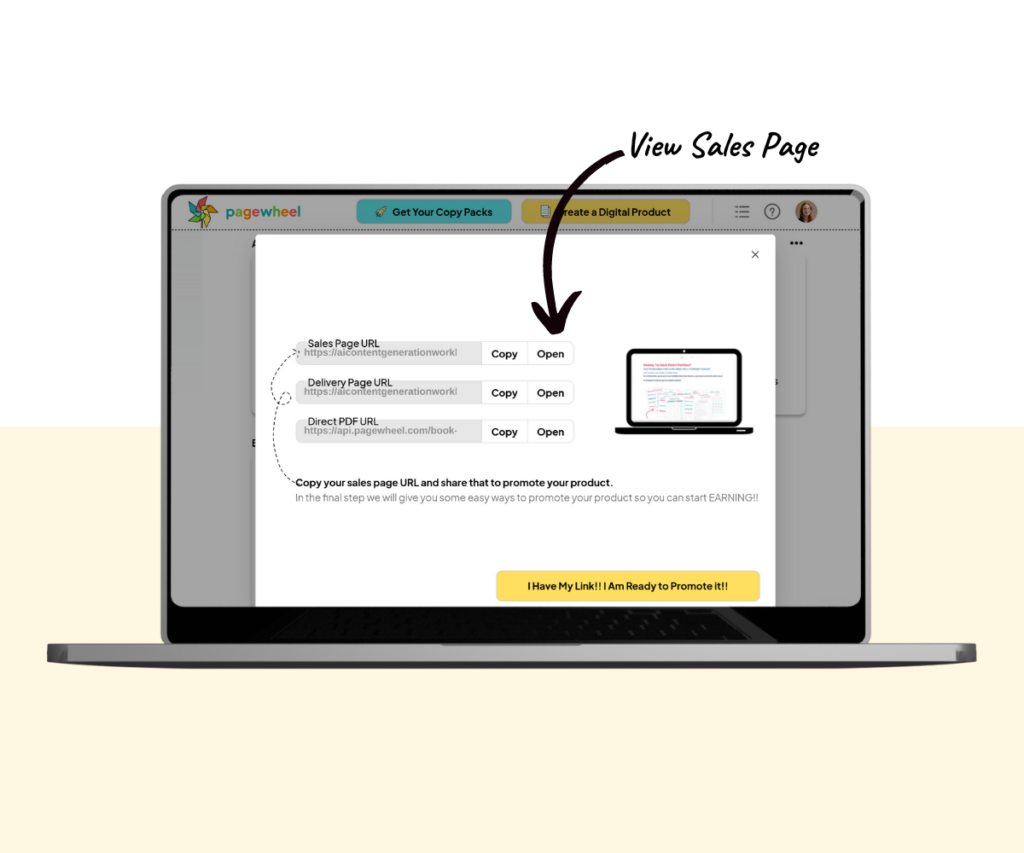
- Find a free product
- Click “Your Links” underneath the listing
- In the new window, click the ‘Open’ button to the right of the Sales Page URL.
For more information, see How to Find the Links to a Product.
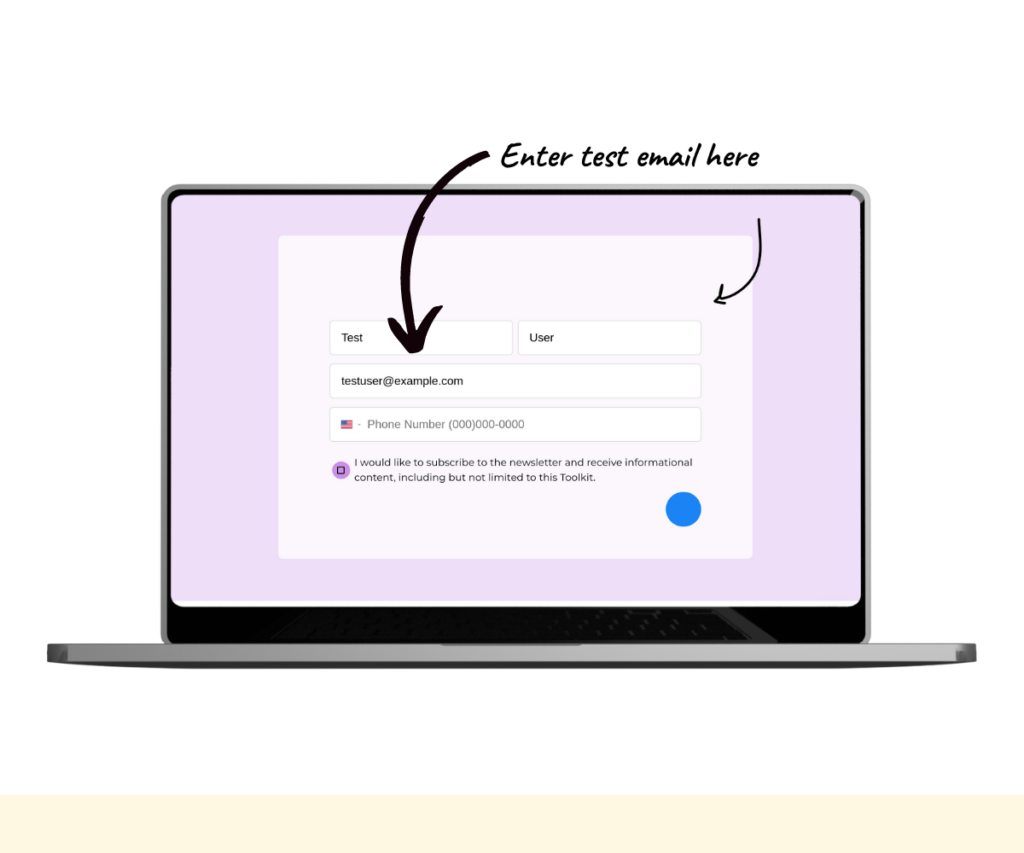
Once you’ve opened the sales page of a free product, scroll down to find the sign-in form.
Use a test email address (e.g. testuser@example.com) to sign up. The email address doesn’t need to be real.
If you don’t have any free products, you can quickly create one with our Free Lead Magnet Guide.
You can also temporarily turn a paid product into a free lead magnet.
For more details, see How to Change the Price of a Digital Product.
Step 2: Wait for Zapier Automation to Run
Zapier runs its automation every 15 minutes.
Wait about 15 minutes for Zapier to process and add the new subscriber.
Step 3: Check Mailchimp Subscriber List for the Test Email
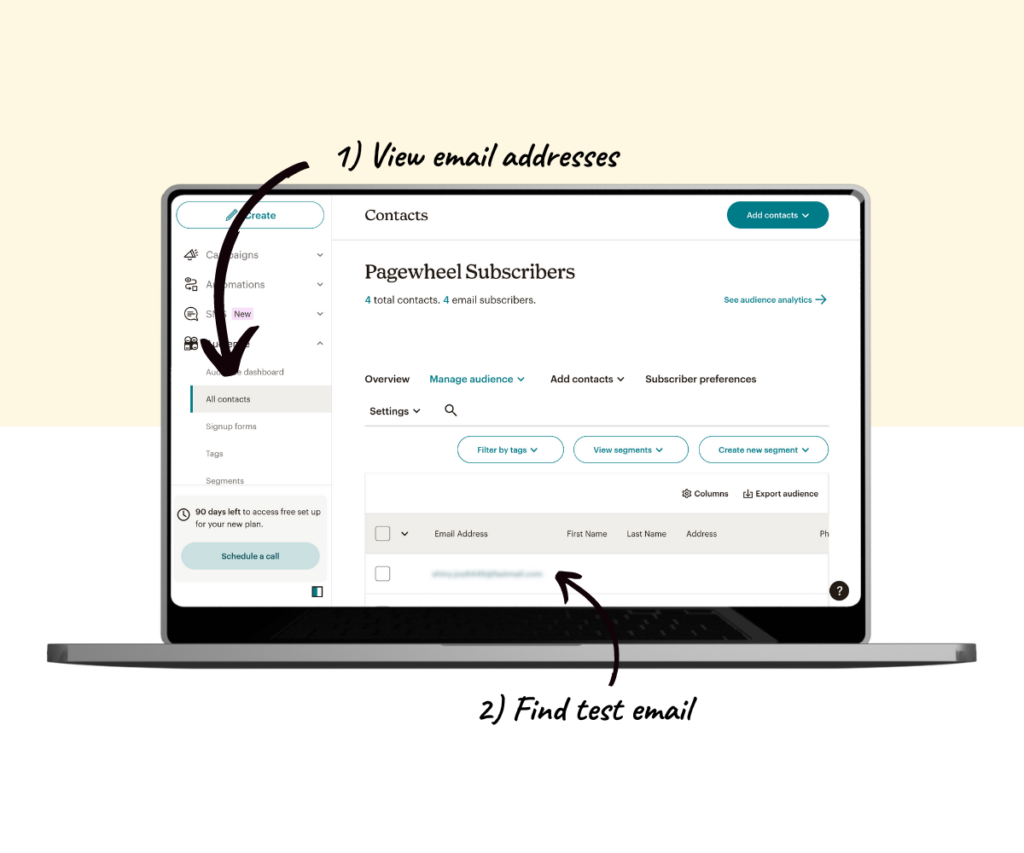
After waiting, log in to your Mailchimp account.
Go to the Audience section in the sidebar, and select “All Contacts”.
Look for the test email address (e.g. testuser@example.com) in your subscriber list to confirm that Zapier successfully added the new subscriber.
If the email address appears, your automation is working perfectly.
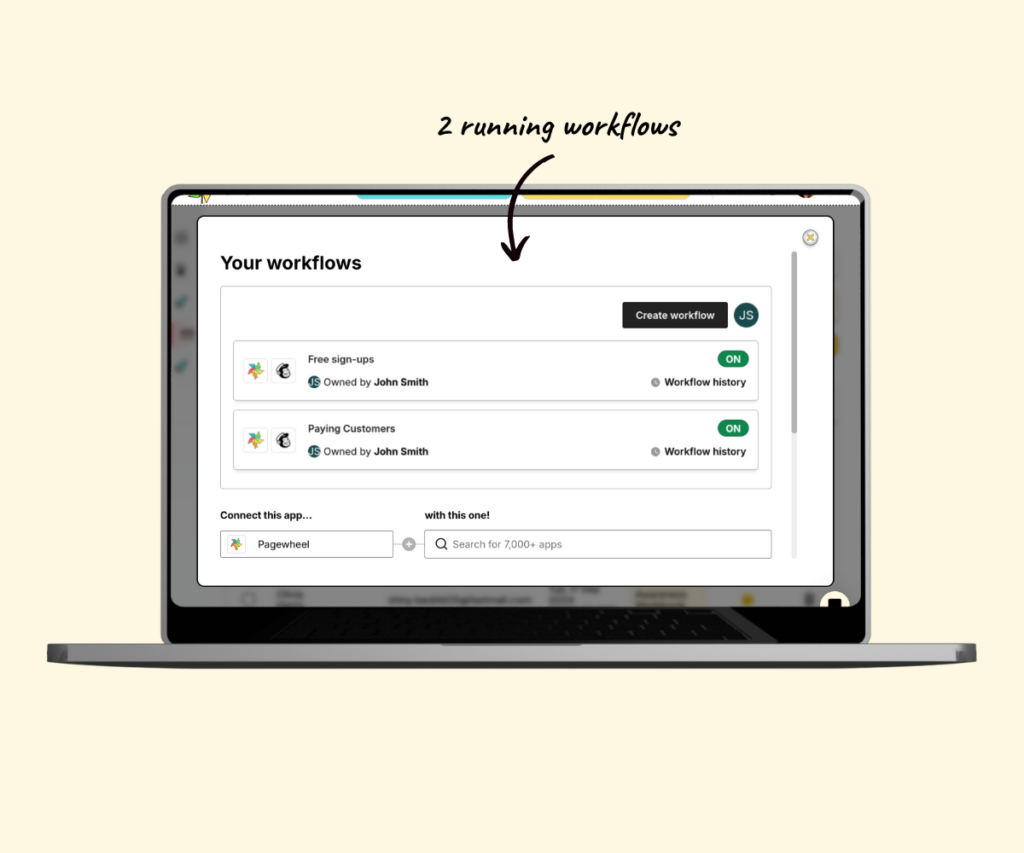
Adding an Automation for Paid Purchases
This guide covers creating an automation workflow for free sign-ups.
To process the email addresses of customers who purchase a product, you’ll need to set up an additional workflow.
This means you’ll have two workflows running – one for free sign-ups and another for paying customers.
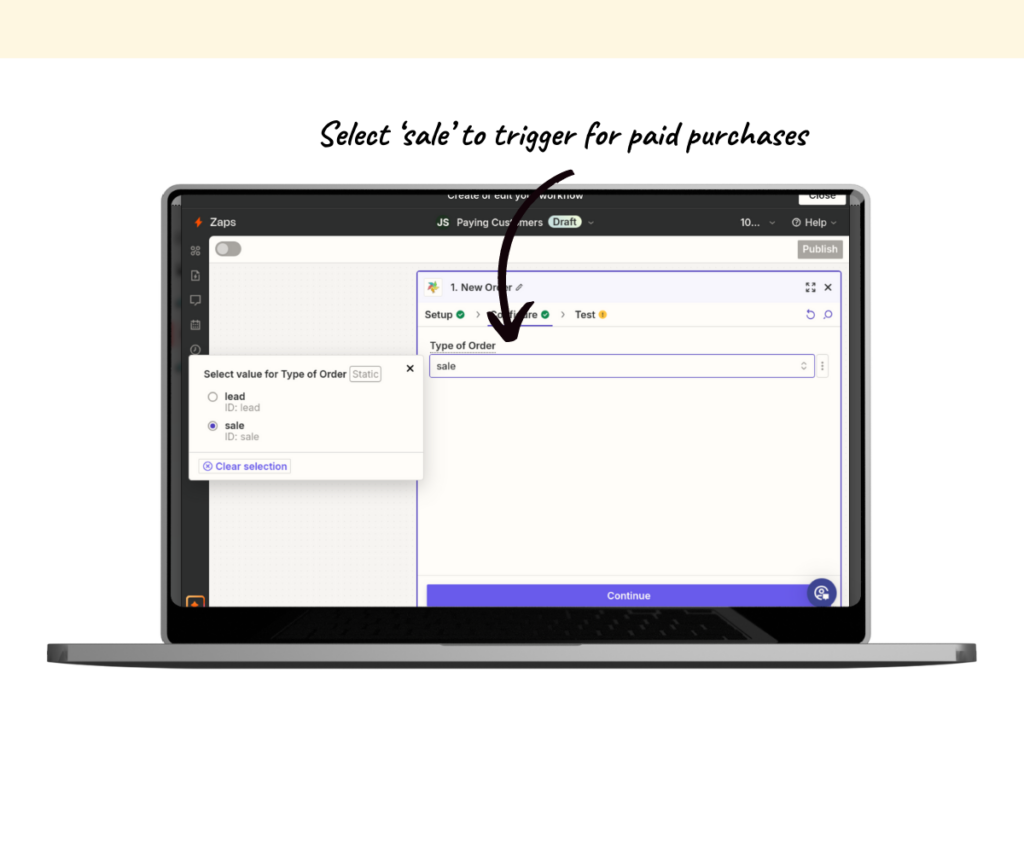
The setup process is the same, but when configuring the Pagewheel trigger step, be sure to select ‘sale’ instead of ‘lead’:
- Go through the same steps to create a new Zapier automation workflow.
- When you reach the Pagewheel trigger step, click the “Type of Order” field.
- Select ‘sale’ to trigger the automation for paid purchases.
- Continue with the rest of the setup, connecting to Mailchimp as usual.
By doing this, your automation workflow will process both free sign-ups and paid purchases, keeping your customer lists organized and helping you target the right audiences.
Additional Resources
- Pagewheel Email Integration FAQs
- How to Find Your Customer Contact Information
- How to Download a List of Your Customer Contact Information
- How to Edit Your Delivery Email
- How to Hide the Phone Number Field on the Sign-Up Form
- Pagewheel User Guide
- Become a Referral Partner – join our Affiliate Program!